Wednesday, June 30, 2021

Movie Trailer


Fact is, despite the current build using metre lengths of tubing, the overall width that includes the stubs on which the motors will be mounted runs to 51" anyway, precisely the same as the outline in the previous post that has rather more to commend it.

On the other hand this one has a track just 41" wide and therefore fits snugly on the trailer, so it seems a shame to scrap it especially in view of the fact little of it could be repurposed to suit the bigger build.

It's also something of a fag having to build any number of prototypes, especially as its a scale demonstrator, or at least here in the UK. However as I've two complete sets of motors, the obvious solution would be to build two working prototypes, which if nothing else reinforces the versatility of the build methodology.

Onward and variously upward...

Tuesday, June 29, 2021

Versa Tile

In terms of practicality ~ when it comes to human-sized drones ~ I can't say better than this. Besides assembling as easily as display furniture it supports my own weight at full scale in the lightest grade of alloy. It is also relatively compact, with a diagonal distance of 36" between axes and 50" square, based on the 32" propellers seen here.

Equally important if you're going to fly this thing is the fact undercarriage is readily supported by connectors at each corner, and there is a natural routing for the wiring. Using four-way tube connectors instead of three-way, corners can also be extended upwards in support of further infrastructure... not least another drone to realise the dream of a flying phone-box?

But even as a platform pitched underfoot, extra motors can be mounted on the same airframe and wired as an X-8. I've always liked the idea of larger propellers running at a constant RPM to conserve energy whilst a smaller set addresses the fluctuations required for flight control, and it meets these purposes.

Did I really have any choice when it came to registering the design, with apologies to Hamburg's University of Technology?

Look on my works, ye flighty, and despair!

Monday, June 28, 2021

I Knew...


... I'd seen the UK government's response to the Covid-19 pandemic somewhere else?

Nobody Puts Monty in the Corner


Something I'd always recommend before cutting metal: the shop-floor layout exercise. Always been intrigued by the fact that prior to the sort of drafting tools we're used to today, they could still build behemoths like the Titanic by chalking up sections life-size on the factory floor by way of a working template.

It's why automakers still build visualisations in timber and clay (or 3-D printed plastics nowadays), or why airline manufacturers mock-up interiors, or indeed why jurists are invited to inspect crime scenes firsthand in an effort to formulate an opinion.

And in this case while the outline in the last post (cue bugle) has much to commend it ~ not least the fact it allows quads to be stacked so as to provide redundancy ~ it does nonetheless highlight the unbearable lightness of the previous being.

Although the lens amplifies the effect, that square in the corner is under 36" whilst the one in the foreground is around 51". That's not far off half as big again, and I know from (bitter) experience that as personal air vehicles (PAVs) scale up, so do all of the associated problems... not least the fact it wouldn't fit the flatbed trailer 'as is'.

And all to carry the self-same payload!

This calls for the sort of executive decision I was occasionally called upon to make as an airline captain... I've no choice but to run with the iteration at the back there.

My aim in all of this is to create a mass-produced flat-pack airframe that will support you or I upon a 'flying carpet' that out-does boats and hovercraft in the first instance, and which can be furnished with additional means thereafter to facilitate free-flight.

The evolution of eVTOLs has shown that getting up there is relatively easy, but staying up in the event of one or other failure is decidedly not.

I've spent a lifetime teaching people how to manage engine failures in airliners, and from the earliest times in the development of jet aircraft in particular, the problem has not been a want of power so much as to how to direct what's left of it in times of crisis.

At the outset therefore it pays to build the most reliable quad conceivable ~ which is after all what over 90% of the world's drones already are ~ than a flaky octocopter.

It remains a fact that more pilots die in twin-engined light aircraft following a single-engine failure, than do pilots of single-engine aircraft in the same circumstances.

The art of staying alive in the air is knowing precisely what you've got beneath you.

Friday, June 25, 2021

Re: Frame


See nothing here, means generally I'm thinking.

And in the ongoing search for the simplest means of making drones big enough to carry people, I've been puzzling over the easiest way of mounting the motors. This here jibes with the way I've always done it, which is to bolt them directly to the tubing albeit with an extra strip of angle-alloy.

So in this case they're bolted to the perimeter of the framework, whilst the ESCs and battery-packs will remain supported by the centre-piece upon which Monty the mannekin will be sat too.

This extends the dimensions of the framework, along with the track of the undercarriage skids... Can you see what it is yet? Get down, Rolf!

... to around four feet square in fact, a happy proportion to which nonetheless the trailer will now need adapting. Those are 32" propeller disks around a 16" flight-deck.

I'm happy with this, not least because I've all the parts in the workshop and expect to see it in all of its three-dimensional glory in the coming days.

So happy in fact that I have a slice of coffee and walnut cake.

p.s. some of you will be upset because there's an offset in the track of the quadcopter relative to the frame. This can be corrected by a software bias to relieve the pilot of constantly turning left, with the flight-control computer attached to the airframe with the same degree of departure.

Monday, June 21, 2021

Battery Park(ed)


Spend a good deal of time fitting brackets upon which to mount the speedos (ESCs) before going for the keep-it-simple solution and gorilla-taping them to the sides, with a side order of cable-ties. This is assisted to an extent by the fact that they are the same depth as the sides of the airframe, and include cooling fins that match precisely the width of said ties too.

As to the battery-packs, I'd set my heart upon suspending them beneath the centre-section before opting for a more practical solution with a view to both operational procedures and maintenance. Among my golden rules is one stating that all motors and propellers should be fitted right-way up, and that all else should be fitted topside whenever possible. Dare to be different, my friends...

For the cognoscenti the packs are 22000 milli-amp-hour LiPo sporting six cells apiece. And can you spot from this view of the airframe the plastic nubs for locating the seat in place? Well done!

And now I'm off for a run... I deserve it, don't you think?

Welcome On Board


'Gentleman, you're very welcome on board. My name's Colin Hilton and as the captain today I shall be flying you from here on the ground with the assistance of my co-pilot, First Officer Futaba. Our flight is expected to take just fifteen minutes today and at a cruising altitude of around fifteen feet, with the weather conditions fine throughout. So now is the time to sit back, relax and enjoy the service as I hand you over to the cabin crew, led this morning by Sven.'

'Gentleman, I shall be responsible for your welfare today and if I could ask you to take a moment to put down your phones, as safety here at TELEDRONE is a close second to getting rich quick. Your lap-strap is fastened, adjusted and released like this (hold up strap) and there are four emergency exits, one at the front, one at the rear and one to either side (show with hands). In the unlikely event of landing on water, your seat-cushion is available as a flotation aid.'

'For your comfort and convenience, all our premium class seats are height adjustable in order to afford the maximum leg-room from the propellers. If you wish to raise your seat prior to the flight, please alert one of the crew to the fact that you need screwing (pause for laughter). Snacks are available before take-off, and toilets to coincide with your in-flight movie, Free Willy.'

This project is going to kill me off long before I get airborne, and watching Netflix of an evening I wish people would stop living useful and rewarding lives. Saw one yesterday about Polish film-maker Tony Malik, though turns out besides a prize documentary-maker he was a prize bull-shitter, never actually having flown in the RAF... which made me feel a lot better.

For the adjustable legs of the seating arrangement I've gone strictly commercial off the shelf, with a four-set of kitchen-cabinet feet, which at £4 under-cuts the height-adjustable Airbus pilot-seat by a considerable margin.

I was thinking to underpin the seat with a false floor to further protect Monty's lower limbs, but I figure ~ along with a five-point harness ~ that it's surplus to requirements.

Test-pilot's furious at concession to budget. 'It's my cock on the block here, guys!' he shouts as he storms out of the meeting.

Saturday, June 19, 2021

All Square?


I delay fitting speed-controllers (ESCs) at this stage to make the airframe easier to work on. Besides, it's important that we set up another look-and-feel session with the test-pilot (who insists on Recaro when it comes to his seating arrangements).

Blade clearance is clearly tight, but then the seat will be elevated and the propellers shrouded to an extent later on to compensate. Worth knowing too that the airframe is slightly under-sized even at half-scale, a result of having been constructed by leftover parts in the workshop.

As a result the perimeter lengths that run around the square which defines the frame run to only .85 metre instead of 1.00 metre, meaning that the propeller axes would be pitched around three-inches further from the centre-section in both directions.

By way of a 'development program' this iteration will likely be programmed for flight in parallel with a rebuild at metre-size, meaning in turn that the electrical equipment can be transferred across with no change in operability.

That said, working now on this vanilla-flavoured quadcopter instead of the octocopter, there's four of everything left over... and enough to build prototype serial number #2.

Mounting Tension


When I first fitted these motors, the question would be quite how? Like most motors for drones, these are 'outrunners' with a canister that itself rotates in place of a rotor. 

Accordingly they include a static base with an array of bolt-holes, which in turn means that there has to be access from beneath for a screwdriver. Some motors include an adapter which pitches the motor-mounts beyond the diameter of the canister, where they can be accessed from either above or below.

As to being set the task originally, I used a simple transfer technique and painted the underside of the motor before applying it to a paper template ~ the way that as kids we made potato prints.

Manufacturers like Boeing need neither potatoes nor poster paint to attach engines, but what they have instead is CAD/CAM. In the absence of this I suggest you get into a word-processing program and draft a template to print off and apply to the brackets at each corner of the airframe. 

Mark with a centre-punch and break for tea prior to drilling, which needs be accurate.

Zen and the Art of Motor Maintenance


The Way of Drone is hard, a life of rigid austerity devoted ultimately to self-levitation.

Looking at my work to date, I realise I have seen something similar in a previous life as an airline captain, during a visit to a shrine in Tokyo in fact.

Accordingly I arrange a pause in proceedings while a Shinto priest recites incantations over the airframe amongst clouds of incense, so as to speed it on its course with every blessing.

As a part of the effort, I compose my own haiku for the occasion:

O drone
Climb Mount Fuji
But slowly, slowly!

(Adapted from the work of Kobayashi Issa, 1763-1828)

All of which stemmed from a moment of supreme enlightenment when I entered a trance-like state in pursuit of the best possible way of fixing the motors.

For in replacing the three-way tube connectors with four-way, I attained nirvana.

Friday, June 18, 2021

California Dream... on.


My mystery shopper in ~ well I can say it now ~ in San Diego has decided to run with his own design, albeit assisted by his local fabricator. As neither of them confess to knowing a thing about drones, the past several days I've devoted much time pointing them In the right direction...  a case of the blind leading the blind if ever there was one.

This was what they had proposed with a view to a machine steerable by weight-shift alone, and the crux of my arguments have been

(a)     don't be fooled by YouTube videos, as few people show the many crashes prior,

(b)    weight-shift machines have generally pitched the mass of motors at the base,

(c)    use more motors rather than fewer,

(d)    and ideally avoid the losses associated with contra-rotating props.

Crucially I suggested that the prototype as envisioned would almost certainly topple over on Day One, taking out several hundred dollars worth of carbon-fibre propeller with it in a best-case scenario.

I'd have gone out there to assist except for the fact travel between the UK and US is embargoed by the UK government's overly-cautious approach to the Covid pandemic.

My efforts over past weeks have thus been among its casualties, albeit one that few of us will mourn beside myself.

I don't regret extending hands of help across the virtual ocean, though it has been a monumental ~ some would say simply mental ~ distraction.

Coincidentally news came through that my pre-existing effort had been granted design registration in the UK, something I use as a matter of record as much as anything:


... although to my chagrin (and doubtless influenced by Monty the mannekin) they've classed it under 'Toys and Games' in order to rub salt into my gaping wounds.

I do feel though like someone who's had a wild fling, and returned to Earth suitably chastened.

And the prototype to which I return ~ unable in the circumstances to celebrate our design registration certificate together ~ still awaits me in the corner of the workshop.

"You bastard!" It shouts, "Off to fucking Pasadena with your fancy octocopter were you? Thought the California girls would melt your popsicle, did you?"

"San Diego, dear..."

"Don't San Diego me, you loser, and don't even think of touching me with that electric screw-driver!"

Fuck.

Wednesday, June 16, 2021

WDA Weigh-In


Proud of this one as it's made of used material throughout, including the three-way tube connectors retrieved from the wheelie-bin and set upon with an angle-grinder. Had angle-grinders been available in Arthurian times, would he still have been king?

It's looking like a credible flyer already, and Monty can't contain his excitement at the WDA (World Drone Association) weigh-in. He's looking like a mini Tyson Fury, another machine made here in Lancashire.

Without the benefit of the speed controllers and wiring loom, we're checking in at 19.8 kilos or 44 pounds. It includes batteries, motors and Monty himself (who accounts for around 20% of the all-up weight).

Initial reactions? Well I've given it the sprung dance-floor treatment and whilst it can support my own weight in 18-gauge tubing (except the skids, which are 1/16th inch) I would prefer it to be a little stiffer. That would be addressed by the anticipated gauge of alloy section, along with the steel-cored tube connectors. These would add weight, but likely mean that the four external steel braces could have been omitted.

The blade-clearance is a little tight, but that will be addressed by my secret-squirrel technique for mounting the motors. Meanwhile there may be an argument for lowering the mannekin's centre of gravity further.

This could be achieved either by providing for a foot-well in the centre-section at the cost of integrity or by tilting him backwards deck-chair-style at the cost of complexity.

FAQ Terence tweets from Tiverton to say, "Fucking rivets? You're a loser who wouldn't know one end of a welding-torch from another!"

ANS Terence mate, if it was good enough for the Titanic then it's good enough for me.

Tuesday, June 15, 2021

Put Out the Moon and Dismantle the Drone


Of the aspects of all this that kept me awake at night, undoubtably the motor-mounts and undercarriage have most often had me weeping gently into my pillow. At 04:00 today however I figure out a solution for the mounts, and as I've already solved the skids the design of the basic airframe is something of a done deal.

With this in view I dismantle the mock-up intending to re-use the parts, together with odds and sods knocking around the workshop, in a half-scale working model. Or not quite, as they're all close enough to the required size without being exact, but I'm not going to destroy the planet for an inch here and there.

I start then with a rebuild of the centre-section, although upped from the 12" square used in the mock-up to the 15" here that I had kicking around. The cantilevers you see here are those lengths that formed the sides of the mock-up's airframe, and these I have left at 24" as I couldn't be bothered getting the jig-saw out. Me at Airbus: "Office please Hilton and explain why one wing is longer than the other?"

I've also repurposed the 18-gauge aluminium tubing for this, though 1/16th would have been my tipple of choice.

Here's a tip though: to line this up in the absence of what professionals call a jig, take two of your cantilever arms and bolt then parallel as shown, using the remaining pair (as indicated by the mystery gloves) as a simple prop. Then BEFORE you rivet the two remaining arms in place, drill the 6mm holes required in order to bolt the abutments together in a material embrace.

All of this works, and only too well. Am unable to re-use the three-way plastic tube connectors used in the mock-up, because they're now stuck faster than Excalibur. Always use silicone instead of mastic, children, if you're going to dismantle the drone. Meanwhile below, in today's double-picture feature, we can see how the assembly is flipped over in order to mark up parts for drilling:

Monday, June 14, 2021

Happy Mondays


Let's do it ~ build the world's lightest and most versatile people-carrying quadcopter.

I've started by envisioning the half-scale proof-of-concept that will haul Monty's ass around the sky. And having started to sketch it out on A4, I quickly abandoned doing so for Apple's Pages. This includes many features of what used to be called 'desktop publishing' back in the day and here its most useful feature is the ability to dimension the parts fairly quickly.

Pages accepts inches as an overwrite for centimetres and thus we can go for an A4 portrait format at the outset, and I have gone for a 1:10 scale diagram of the proof-of-concept (POC), which itself is base upon a 32" outline... and indeed 32" propellers.

Suppliers like T-motor work in metric until talking about propellers, when in deference to the US ~ who invented flying ~ they switch to inches instead. And for the POC I am using what I have in the workshop in the form of 32" propellers fitted to T-motor U13s. 

And the nice thing about the design is that the perimeter lengths match the same diameter of 32" because the three-way connectors that join them together add a further inch to either side (so that the OUTSIDE dimension of the square is 34"). 

As the motors will be pitched centrally on the inch-wide connectors their axes are pitched 33" apart, allowing for blade clearance. So we'll order 4 x 32" x 1/16" lengths of alloy in order to define the 'square-frame' that supports the power-plants.

I guessed at the size of the centre-section and at 16" square it seems to fit the job. Accordingly, with the inside dimensions of the square-frame set at 32" there is eight inches of clearance all around the centre-section. Nonetheless we must subtract the one-inch width of each of the abutting cantilevers, which takes us down to 23".

Beyond that there are threaded inserts in either end of the cantilevers in order to fix the abutment and connect the flight-deck to the square-frame. From our mock-up we saw that a couple of connectors run to around 3/8th inch, so we have the following to order from our tube stockist:

    (a)    4 off at 32" x 1/16" perimeter lengths (total 128")

    (b)    4 off at 22⅝" x 1/16" cantilevers (circa 96")

This adds up to 224" or 5.67 metres in the UK, good if you can find stock lengths of six metres, but bad if like my supplier they only do five. Nonetheless I've enough left-overs to make a start. 

However a quick look at retail sites in the US like:


... reveals that 288" is a stock length, so you've enough left over for four legs too!

How long are the legs going to be? Well I haven't decided yet and I shall deal with it at the same time as the landing skids, which can be tailored to operational circs. There's a precedent for this, as an image search on 'Hughes 500' shows longer and shorter legs over the course of history.

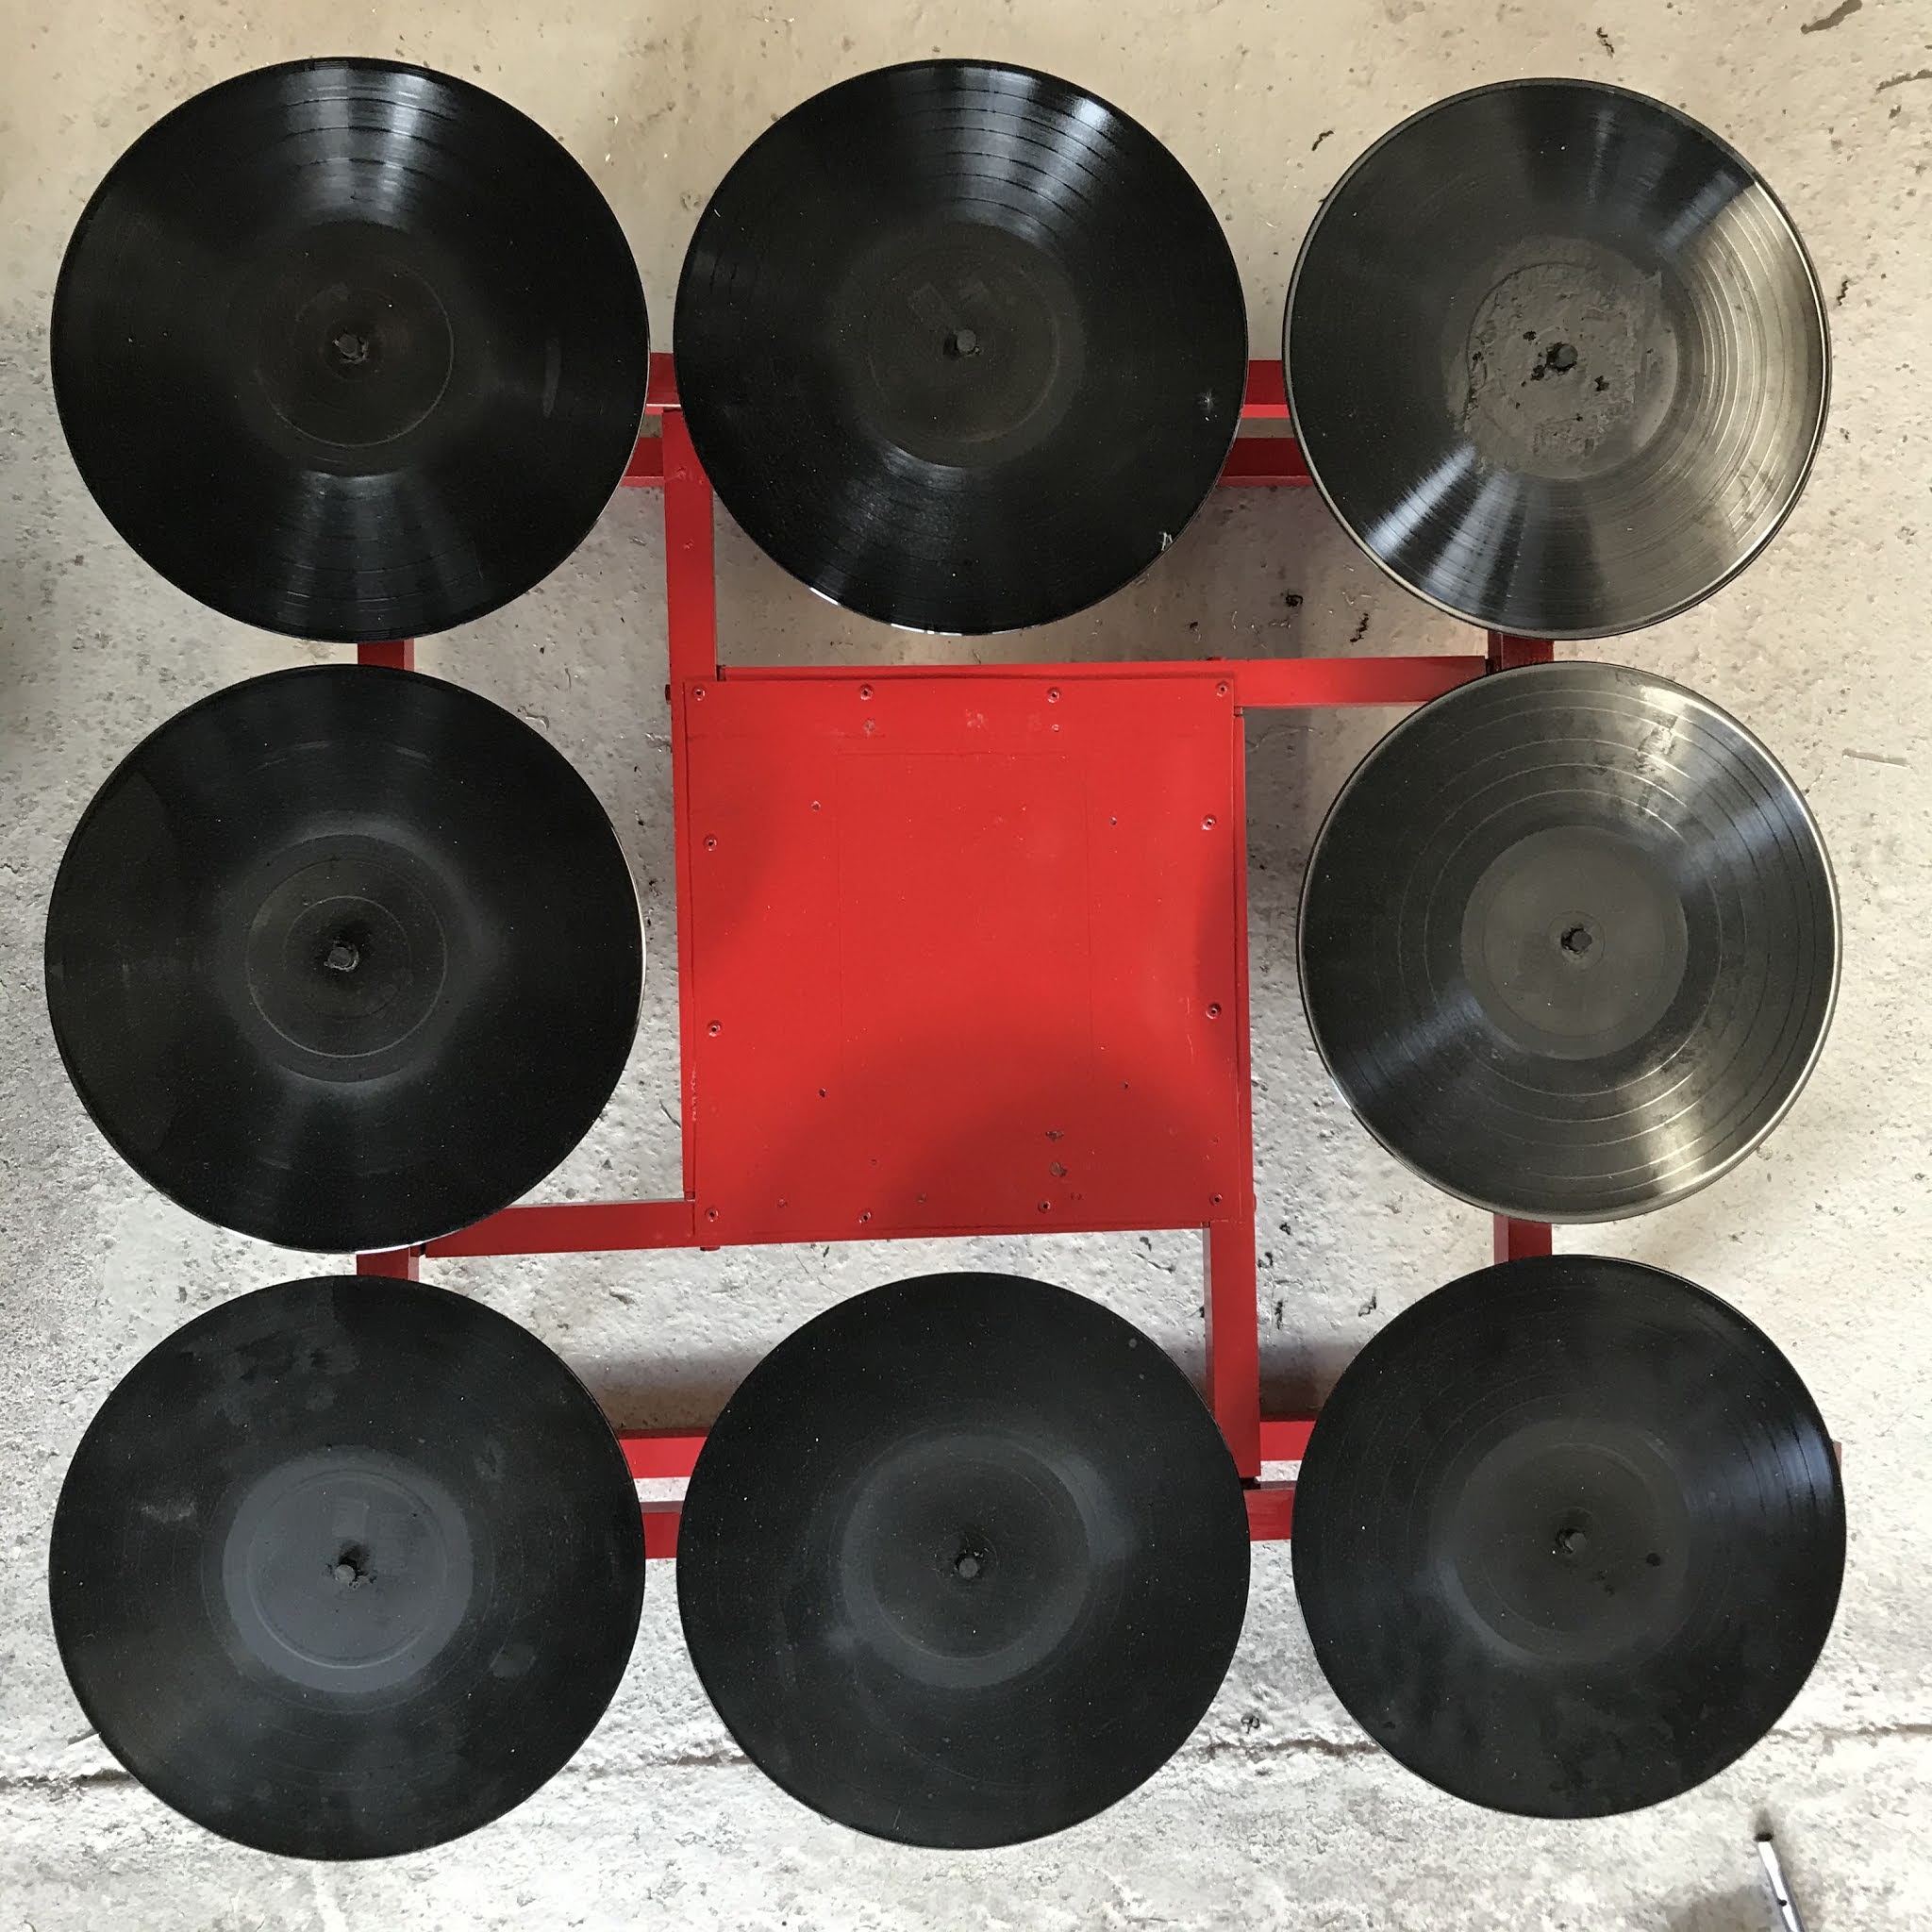
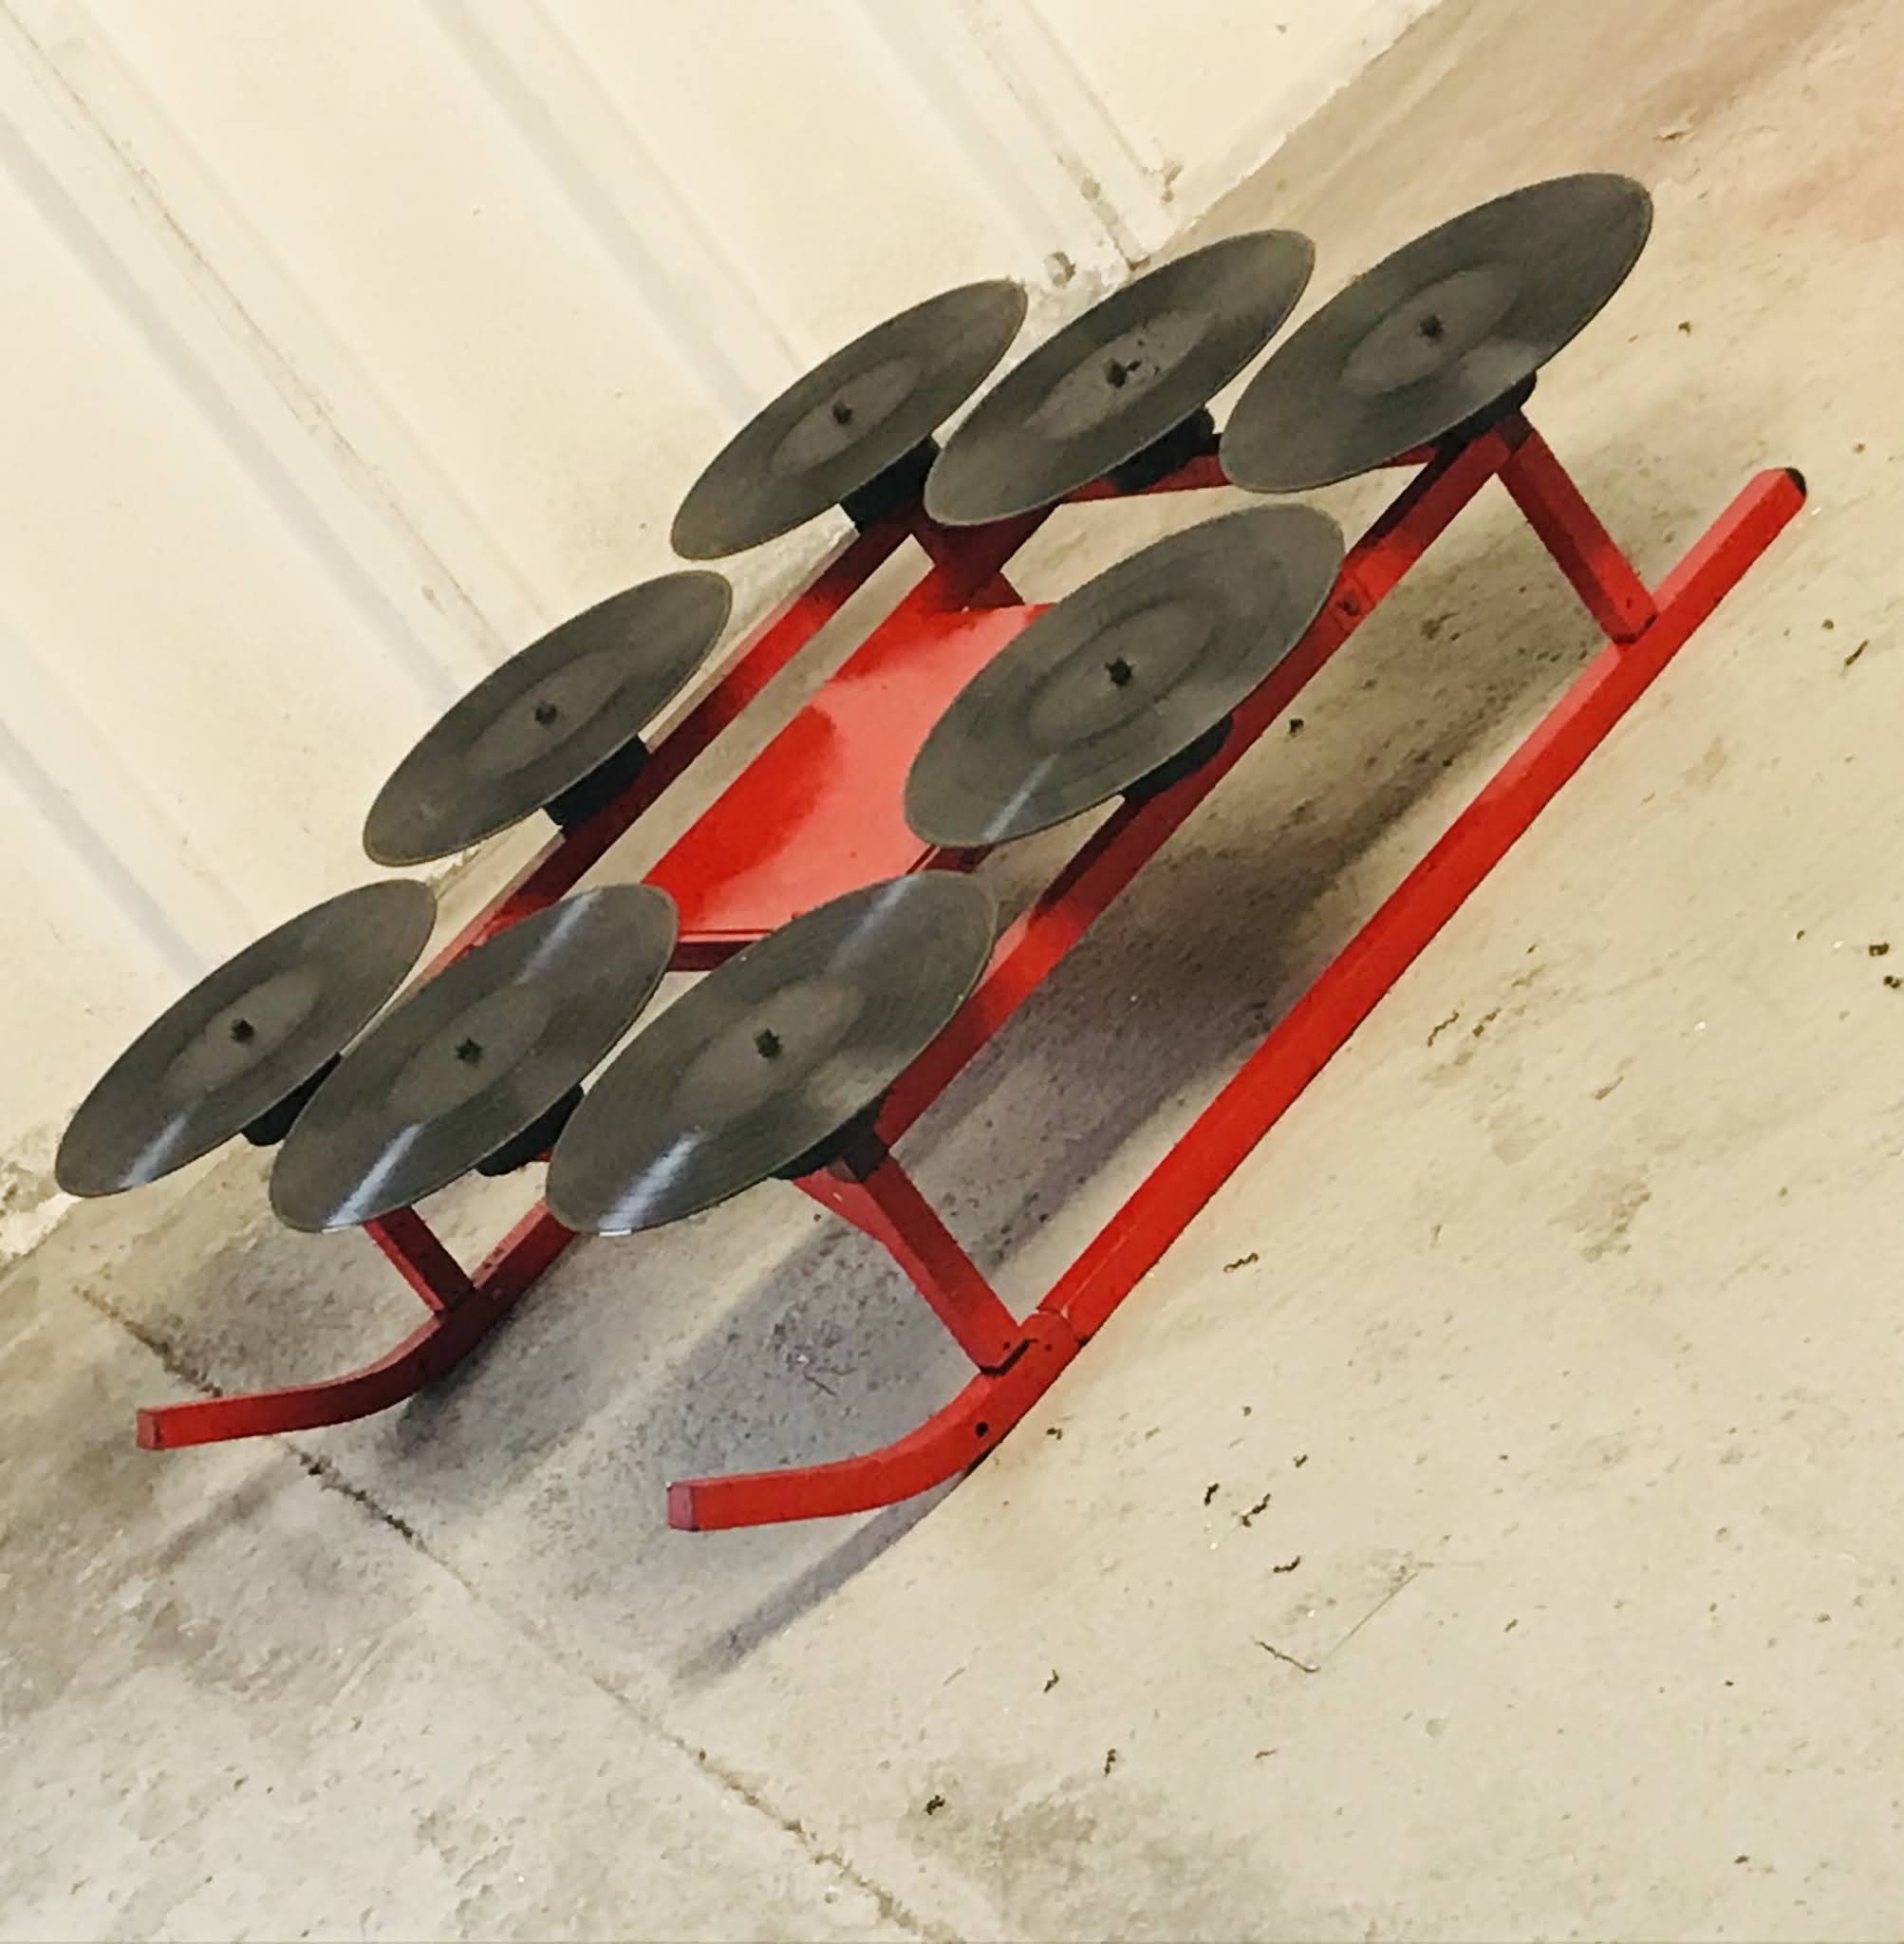
FAQ Dave from Oklahoma asks, "Should I be nervous seeing that the centre-section appears to be overlapped by the prop-disks?"

ANS When will this generation listen? The motors pitch the props higher, and their efflux funnels considerably, reducing any losses. The mannekin will be set above the line of the disks anyhow, as we saw recently in the scriptures:

"And Colin raised them in their hour of need, above the line of their rotor-disks."

Sunday, June 13, 2021

Sod It, Let's Quad It...


Some of my best and worst thinking takes place at 04:00 a.m. and not least because I might well have had a skinful. At this, the 'darkest time before the dawn' that every airline pilot knows to be bollocks, I can't help thinking that all of this is just a belated effort to revisit a wasted youth in which I'd forgone the chance to fly helicopters.

The REM-fuelled dreams on falling asleep again at this hour are equally vivid, and in this morning's instalment I'm visited by a posse of tax-inspectors whose leader I pin down and stab to death with an item from a geometry set ~ the dreams in which other people are dying are the best I've ever had, as Donnie Darko sang.

It's around this time that I also revisit the outline to see if it can be made yet simpler, and wonder if there's an argument for using the same frame to build a quad instead. Turns out there is. Upping those propellers from three to six feet still allows for a respectable two-feet square centre-body, which can be extended as we've seen once pitched above the level of the disks.

The skids are therefore set at about a six-feet width, which will get you through the garage door and onto the back of a flat-bed trailer... all of which I shall recommend to my contact in California as the simplest solution to the question of a kit-build eVTOL. Beside the skids it can be made from just four parts each of arm, perimeter and leg, together with a similar number of connectors or castors.

All I've really done in life is day-dream, fly aircraft or visit transport museums and I do like people who reduce a part-count. Visiting one such place in Arnhem revealed how two Eastern Europeans reduced the components of the STEN gun by two-thirds, after which it became the side-arm of choice for the French resistance.

Furthermore I've much of the material to get Monty the Mannekin flying at half-scale right here and at a weight that won't attract the attentions of the CAA inspectors... whom I could always stab to death with a piece from a geometry set, worst case.

Fact is, the market for eVTOLs is rapidly polarising. The money is on winged types like the one just afforded a two billion dollar valuation in the form of Vertical Aerospace. Their offering is like practically every other out there, a format that was pioneered elsewhere at radio-model scale very many years ago.

But electrical air-taxis occupy a moneyed world of who-you-know rather than what, which has led the Vertical Flight Society (VFS) to declare the multicopter prematurely dead; although hummingbirds, commercial drones or for that matter the manufacturer of the Osprey or Chinook seem to have done well out of it. Some or other dirt-bag like me will inevitably find a way to make these things too ubiquitous to ignore.

"The multicopter is dead. Long live the multicopter!"

Saturday, June 12, 2021

Home-Build Guide #29


Turns out it wasn't the 300th post, but this is. Here's the inspiration from the original patent filed a few years back, and as you can see all that I have done is to join the dots in a much sturdier frame altogether. The logic stands, however, in that the eight motors can actually be addressed as a 'virtual' quadcopter.

(Alternatively those motors at the corners can be used for steering alone, whilst those between might address lift alone, so that the conventional cyclic, collective and yaw controls associated with helicopters might still be incorporated.)

Addressed as a quad, each pair of motors would rotate in the same direction, which is not what you would expect of an octo. Life's full of surprises, isn't it?

Whether these efforts come to fruition ~ or whether I return to the double-decked design currently simmering on the back-burner ~ is up to fate itself.

Home-Build Guide #28


What we have to remember however is that propeller disks are practically invisible and this is how the airframe would broadly look in operation, for which visualisation I have added a single propeller. The advantages of the airframe for transport is obvious from this, in that each of the propellers can be aligned with the frame when at rest. 

To complete a working prototype, the batteries would be suspended in a tray beneath the main deck, which itself would support the electronics associated with controlling drones. This would also support a plinth with which to accommodate a standing or seated operator, fixed at four corners using the hard-points previously incorporated.

As a practical flat-packed GEV or PAV I believe it passes muster, and as this is the blogs 300th post in pursuit of a practical 'flying carpet', frankly I don't care whether anyone likes it or not...

Home-Build Guide #27


How things look with the rotors in place. It is clear that by shrouding the surrounds (to some extent or another by extending the flight deck), more efficient lift might be contrived.

Home-Build Guide #26


And the brackets are riveted to the perimeter frame. They'll will be wired from each corner of the flight-deck, and as we see later that can be operated as a single entity. In other words, a virtual quadcopter in which two rotor replace each single rotor for a smoother ride, cheaper components, a measure of redundancy and a more compact footprint.

Home-Build Guide #25


The motors will be addressed by the control logic and wiring in pairs, and so I cut out a pair of dog-bone brackets not unlike those used on industrial drones. except double-ended in this instance. Plus they're plywood for the mock-up and not laser-cut carbon fibre sheet.

Home-Build Guide #24


"And on the third day, Colin created a beast of the air. And he saw that it was good." It pays at the start of each day in the workshop to visualise, to pause and create a mock-up of the mock-up, or a mother of all mock-ups.

First impressions? Well historically my machines have lacked adequate clearance from blade-strike, and I like the stance of this one... redolent of the legendary Hughes 500 known in Vietnam as 'Little Bird' and I name this one 'Even Smaller Bird'.

It looks somewhat 'lumpen', rendered as it is with inch-square alloy that should be half as thick. This however is because commonly most material comes measured by the inch, or 25 millimetres.

I like its compactness. It sits there and says, "Fuck you, your'e never going to be more compact than me." I do wish it was more refined in its use of language like me though.

You will be thinking ~ though I'm not ~ that it looks like a human salami slicer. That however is why we incorporated those hard-points: for we are going to raise the flight deck on a par with the disks, from whence our protection will come.

Join me now if you would by praising me in singing:

You raise me up, so I can stand on drones
You raise me up, to fly over stormy seas
I am strong, when I am on your flight-deck
You raise me up to more than I can be,
or at least as high as the rotor-disks.

Friday, June 11, 2021

Home-Build Guide #23


Weight-wise, where are we? Well the basic chassis weighs just eight pounds, though the bulk of the weight in electrical air vehicles, like cars, lies in the batteries and motors that are yet to be fitted. With road vehicles you can be fairly liberal with these goods, but in aircraft in particular there is a diminishing return from simply adding more packs of batteries in an effort to create more lift from larger motors.

The build philosophy therefore is strictly to start light and to go lighter, and as a part of that effort the comparative weight of the airframe has to be almost negligible. We can go part way toward that in alloy, but much further with carbon-fibre.

But then Rome wasn't built in a day was it... even in brick?

Home-Build Guide #22


We're over at the paint-shop here about six inches distant from the assembly line, and she's in for a coat of shiny red paint. Here at TELEDRONE in the UK we've a penchant for using post-box red. This stems from the days of designing drones that looked like flying telephone-booths, until such time as realising that nobody wanted one. Actually they did, they just didn't want to pay for it.

It was this Zen-like revelation that brought us here together in our efforts to build a universal 'flying carpet' to fulfil our wildest fantasies, whilst making me extremely rich.

In our next episode, expect me to be mounting the motors. If I'd known that that was all I'd be mounting on a Friday night, I think I'd have given up a long time ago.

Home-Build Guide #21


I've co-opted our test-pilot Monty the Mannekin, who's done tours of duty in Helmand province besides Mothercare in Croydon. Monty is a half-scale dummy, but don't ever let him hear you say that. As a result he is overly large for the mock-up, but gives you an idea of where we are headed. He will also come into his own once we replace this mock-up with a near full-scale model using 32" propellers in place of the twelve-inch vinyl that we're blessed with here.

There's still a chance at this stage of gratuitous sex if you tell people you build sleds for underprivileged kids.

Home-Build Guide #20


Here I've attached the skids ~ pointing in the right direction ~ using 40 x 6 mm bolts that are countersunk so as not to catch whichever surfaces we might be alighting on. Note too (by standing on the upright structure if necessary) that we're weak in the side-load department until such time as we fit shear webs as shown, in the form of the sort of brackets used for building kitchen cabinets. They cost just pennies, and got from the legendary Garners' in Skelmersdale, ironmongers to the mining trade since 1878.

The brackets also include pre-drilled holes matching the size of my pop-rivets, which is a marriage made in heaven if ever there was one.


Home-Build Guide #19


In order not to spoil it all as I did earlier by drilling the wrong face of the tubing in question, here I have turned the skids through ninety degrees. Now, and as indicated by the pointy rubber glove, we take our spare length and mark where the skid should meet the struts at each of the four corners of the airframe perimeter. The ballast is to keep everything steady in place of the more professional jig, which we're not into here.

Home-Build Guide #18


I've gone for shorter skids than anticipated, and in fact they're off a previous build and cut in half. It is therefore going to be something of an Apache Short-bow, and note that the horns of the skids are cut-offs that I've used repeatedly. They are secured here by a 20mm by 20mm timber insert to which they are glued, with a pop-rivet or two to secure.

The trailing ends have domed inserts, which for square as against circular sections are generally rounded ends rather than domes, and therefore the rounded edges should be set top and bottom of the skid (instead of either side), as this provides curvature at the rear end beside the front. Think reversible snowboards.

Home-Build Guide #17


For the stanchions/legs/struts in each corner I've used surplus 18 gauge inch-square aluminium of a length of around six inches, allowing this time for just one tube insert viz. M6 threaded at the bottom end. At the top end the alloy tubing runs flush to the uppermost reach of the three-way connector.

At this stage if you've people over for dinner and you are able to persuade them that it's a genuine Bauhaus coffee-table, then sell at a profit and get out while the going is good.

Home-Build Guide #16


With the flight-deck in situ, and bearing in mind that this is a third-scale mock-up, now is the time to stress-test the construction. I'm pushing a post-pandemic twelve stone here, and there's barely a murmur from my 18-gauge alloys. "She's a fine vessel sir, and no mistake." I say to myself.

In fact it should feel like the sprung dance-floor in Blackpool's Tower Ballroom, as in the TV series Strictly Come Droning.

Of course a 1" square section is too large at this scale anyway, so as we scale up we're likely to stick with it, increasing the thickness as we go. We'll go a long way on 1/16th inch instead, whilst we can only dream of working in 1/8th. And we've yet to begin to talk about aviation grade alloys!

(And though I've always been a bit of a metal-basher, there's carbon-fibre tubes for the fledglings amongst us too.)

Take a break, for this afternoon I'll be putting the skids under us all.

Home-Build Guide #15


NOTE OF CAUTION, because I make a major-league mistake here in starting to drill from the top, when of course I should have gone in from the sides... having glued the three-way tube-connectors in place yesterday evening.

NOTE TO SELF, refrain from gluing connectors in place until after this stage of build. This is because it is much easier to drill from above ~ as seen here ~ and then turn all of the tubes through ninety degrees.

There's a lot of trial and error in this game, for as the great industrialist James Dyson observed, "You learn nothing until you start building".

If you want to avoid your prototype looking like a Swiss cheese, follow the master.

Home-Build Guide #14


Now children, we need to fit our flight-deck to the perimeter, don't we?

There's a bit of a gap here and there and so I've centred it broadly and pinned it to the floor with a bit of ballast whilst I mark where the external bolt-holes need locating.

Note the sign "U/side" and the stanchions (or legs to you) all point upwards here, with the airframe inverted.

Home-Build Guide #13


The coup-de-grace, and I fit the lower skin of the flight-deck and tighten the bolts up after riveting as previous. Those are M6 bolts, beloved of the Honda motorbikes I used as a teenager, and they are driven into the ends of the rotor-arms. If you want to go belt-and-braces, glue them in to and pop-rivet all round.

The FAA might be chary of the method in the absence of welding, but believe me you could hang one of your neighbours without these babies giving way.

If you are really anal, however, you can drive a threaded rod in steel (heavy) or nylon (light) all the way through from one end to the other... but my way's the high way.

Note the all important "U/side" moniker in permanent marker, essential if your Huey-style skids are not to be fitted facing the wrong way up.